

6. Wirelessly Debug React Native Apps on Android: Step-by-Step Guide [windows only]


Table of contents
I recommend going through the previous blogs of this Series: https://maroofs.hashnode.dev/series/react-native-development
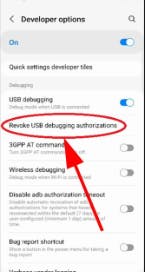
NOTE: If you have done any misconfiguration with the Usb or Wireless Debugging and want to revert it back. In your Android Device, Go to Developer Option > Debugging > Revoke USB Debugging authorisations > Click on ok.
After this, you can use your USB debugging normally.
For Wireless Debugging follow the below steps:
Prerequisite:
Connect Your PC or Laptop and the Physical Device to the same network.
Connect Your PC or Laptop and the Physical Device with a USB cable
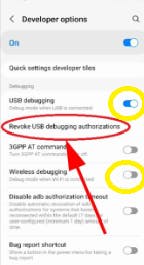
Turn on USB Debugging and Wireless Debugging in Developer Option. [see the circle in 🟡 colour.
Execute the below commands in Project Directory:
adb kill-server and adb start-serverThis command is used to restart the ADB (Android Debug Bridge) server. ADB is a command-line tool that allows communication between your computer and Android devices.
adb tcpip 5555This command sets the ADB to work over TCP/IP (network) instead of USB. It specifies the port number 5555 for the ADB communication.
adb reverse tcp:8081 tcp:5555This command sets up a reverse connection from the Android device to your computer. It forwards traffic from port 8081 on your computer to port 5555 on the Android device. This is necessary for the device to access the development server running on your computer.
adb connect YOUR.PHONE.IP.ADDRESS:5555Replace YOUR.PHONE.IP.ADDRESS with the actual IP address of your Android device. This command connects the Android device to the ADB server running on your computer over the network.
Disconnect the USB wire: Once the device is connected to the ADB server over the network, you can disconnect the USB cable between your phone and computer.
Install the app on your phone: If the React Native app is not yet installed on your phone, you can install it using the command
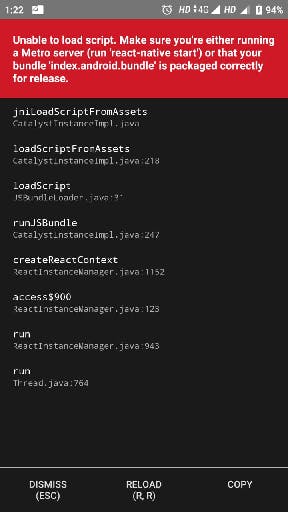
react-native run android.Open the app and encounter the "Unable to load Script" error: When you open the app on your phone, you may encounter an error message saying "Unable to load Script." This is because the app is trying to load the JavaScript bundle from the development server but cannot find it yet.
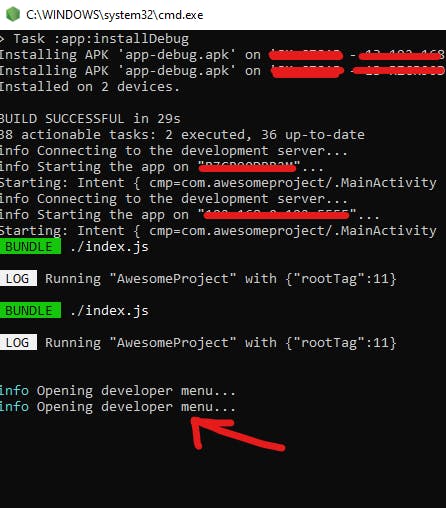
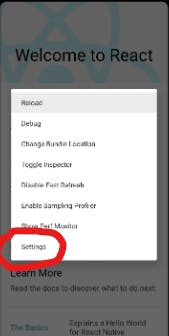
Open Developer Menu: Press 'd' key into the Metro console windows to Open Developer's Menu.
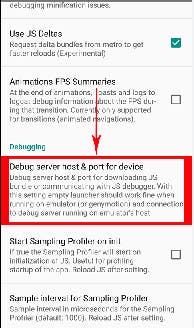
Go to Settings > In Debugging category > click on Debug Server host & port for device.
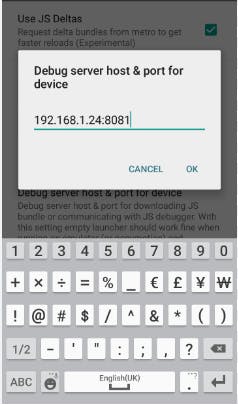
Enter your computer's IP address and port number: Enter your computer's IP address followed by the port number 8081 in the window on your phone. This tells the app where to find the development server. [don't refer Image IP Address, run command
ipconfigto know your IP]
Remove the USB cable and Enjoy your hassle-free Wireless Debugging, without wires. Try running the npx react-native start after this npx react-native run-android if nothing works.
If someone tries to use Wireless Debugging after Shutdown/Restart PC or Android Device the IP address would have changed.
Therefore make sure only Android Device IP changes go till Step 6 above or else repeat all steps.